
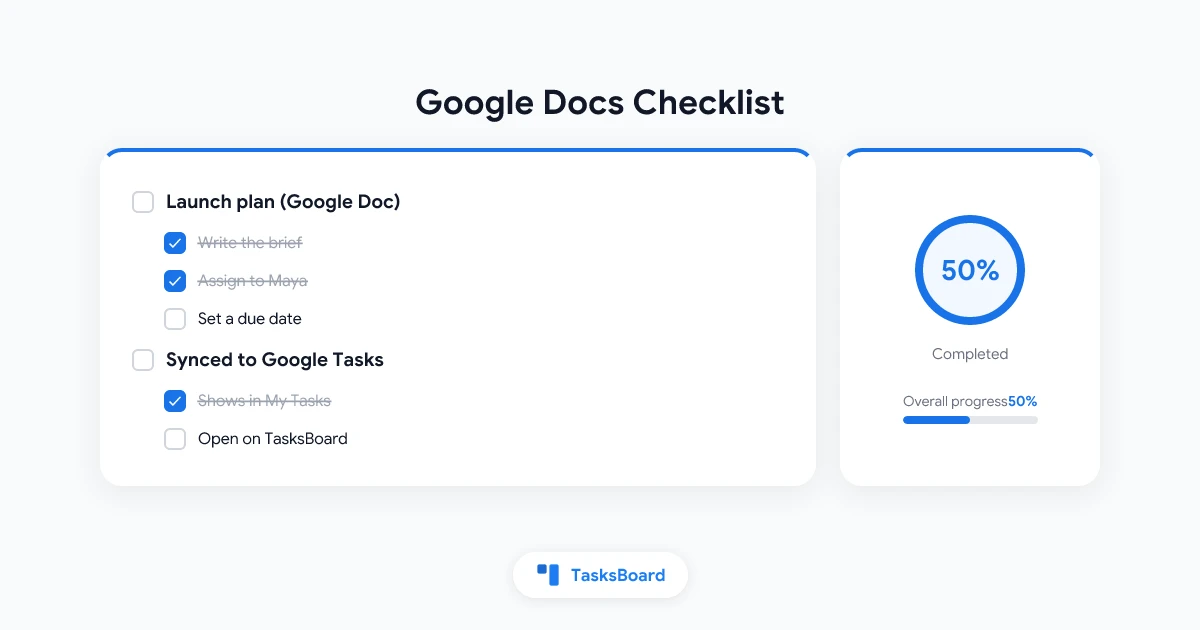
A Google Docs checklist takes one click: put the cursor where the list should start, press the Checklist button in the toolbar, and type one item per line. On a work or school Google Workspace account, each item can also be assigned to a person, and that item becomes a real Google Task.
This guide covers both halves. First, how to make a checklist in Google Docs, with or without the strikethrough, nested, and reused as a template. Then, how to assign checklist items as tasks, what syncs back and forth, and where those tasks show up afterwards, including on a TasksBoard board.
Quick answer:
- Click the Checklist button in the toolbar, use Format, then Bullets & numbering, then Checklist, press Ctrl+Shift+9 (Cmd+Shift+9 on a Mac), or type @checklist.
- Pick the checklist style without strike-through from the same menu if you do not want finished items crossed out.
- Assigning an item as a task needs a work or school account and edit access to the document. Personal Google Accounts can make checklists but cannot assign them.
- Assigned items land in the assignee’s default Google Tasks list, “My Tasks”, and the title, date and completion state sync in both directions.
How to Make a Checklist in Google Docs
The checklist is a list type, like bullets or numbers, so it lives in the same toolbar group and the same Format menu.
- Place the cursor. Click the line where the checklist should start, or select existing lines to convert them into checkboxes.
- Click the Checklist button. It sits next to the bulleted and numbered list buttons. Google’s help on lists adds the menu route, Format, then Bullets & numbering, then Checklist, and notes that a hidden button appears under More when the window is narrow.
- Type one item per line. Press Enter after each item to get a new box.
- Nest sub-steps with Tab. Google’s page explains that Tab starts an indented list inside the list, and pressing Enter twice returns to the main level.
- Check items off. Click a box to mark the item done.
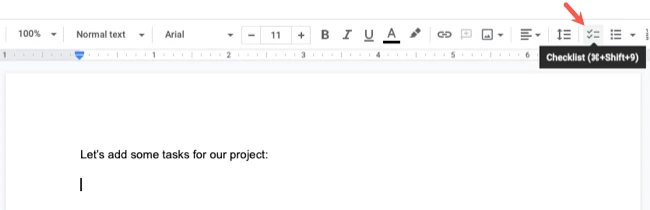
Two shortcuts save the trip to the toolbar. Google’s list of Docs keyboard shortcuts gives Ctrl+Shift+9 for a checklist on Windows and ChromeOS, which becomes Cmd+Shift+9 on a Mac, and Google’s page on assigning tasks says that typing @checklist and pressing Enter inserts one too.
Google Docs checklist without strikethrough
By default, a checked item is crossed out. Google’s help on lists says the Checklist entry under Format, then Bullets & numbering, offers a checklist “with or without strike-through”, so the fix is a style change, not a workaround.
Click any checkbox in the list, open Format, then Bullets & numbering, then Checklist, and pick the style without the line. The same help page notes that clicking a checkbox and then the Text color button recolors the boxes.
Add a checklist on a phone
The Docs app has the same list type. Google’s steps for Android are to open the document, tap Edit, tap where the list should go, tap Lists at the bottom right, then tap Checklist.
Is There a Google Docs Checklist Template?
Google’s help explains how to insert a checklist but points to no ready-made template, so a template in Docs is simply a document you keep clean and copy. Open it, choose File, then Make a copy, and run the copy.
A reusable checklist document is easier to follow when it keeps a few habits:
- One action per box, starting with a verb: “Send the kickoff invite”, not “Kickoff”.
- Headings for phases, so a long checklist reads as sections rather than one wall of boxes.
- Sub-steps nested with Tab, kept to the details people forget.
- A line at the top that says when to copy the document and who keeps the master.
 Three ways to reuse a checklist
A document copy suits a checklist you run a few times a year. For a weekly or monthly one, a Google Tasks template fits better, because it is a list of dated tasks rather than a page of text.
In TasksBoard, the list menu has a Duplicate list command. According to the help center page on duplicating a list, the copy keeps every task, subtask, note and due date, and is a real Google Tasks list that also shows in the Google Tasks apps.
How to Assign a Google Docs Checklist Item as a Google Task
Assignment turns a checkbox into a task in someone’s Google Tasks account. Two requirements decide whether you will see the option at all.
- A work or school account. Google’s page on assigning tasks from Google Docs states that the feature is for work or school accounts, and that you can assign a task to yourself or to other users in your domain.
- Edit access and Tasks turned on. The Workspace Updates announcement from August 2022 says edit access to the document is required to create or edit a task, and that admins must have Google Tasks turned on for the domain. The same post lists the feature as not available to personal Google Accounts, Education Fundamentals or the Teaching and Learning Upgrade.
With those in place, the steps are short:
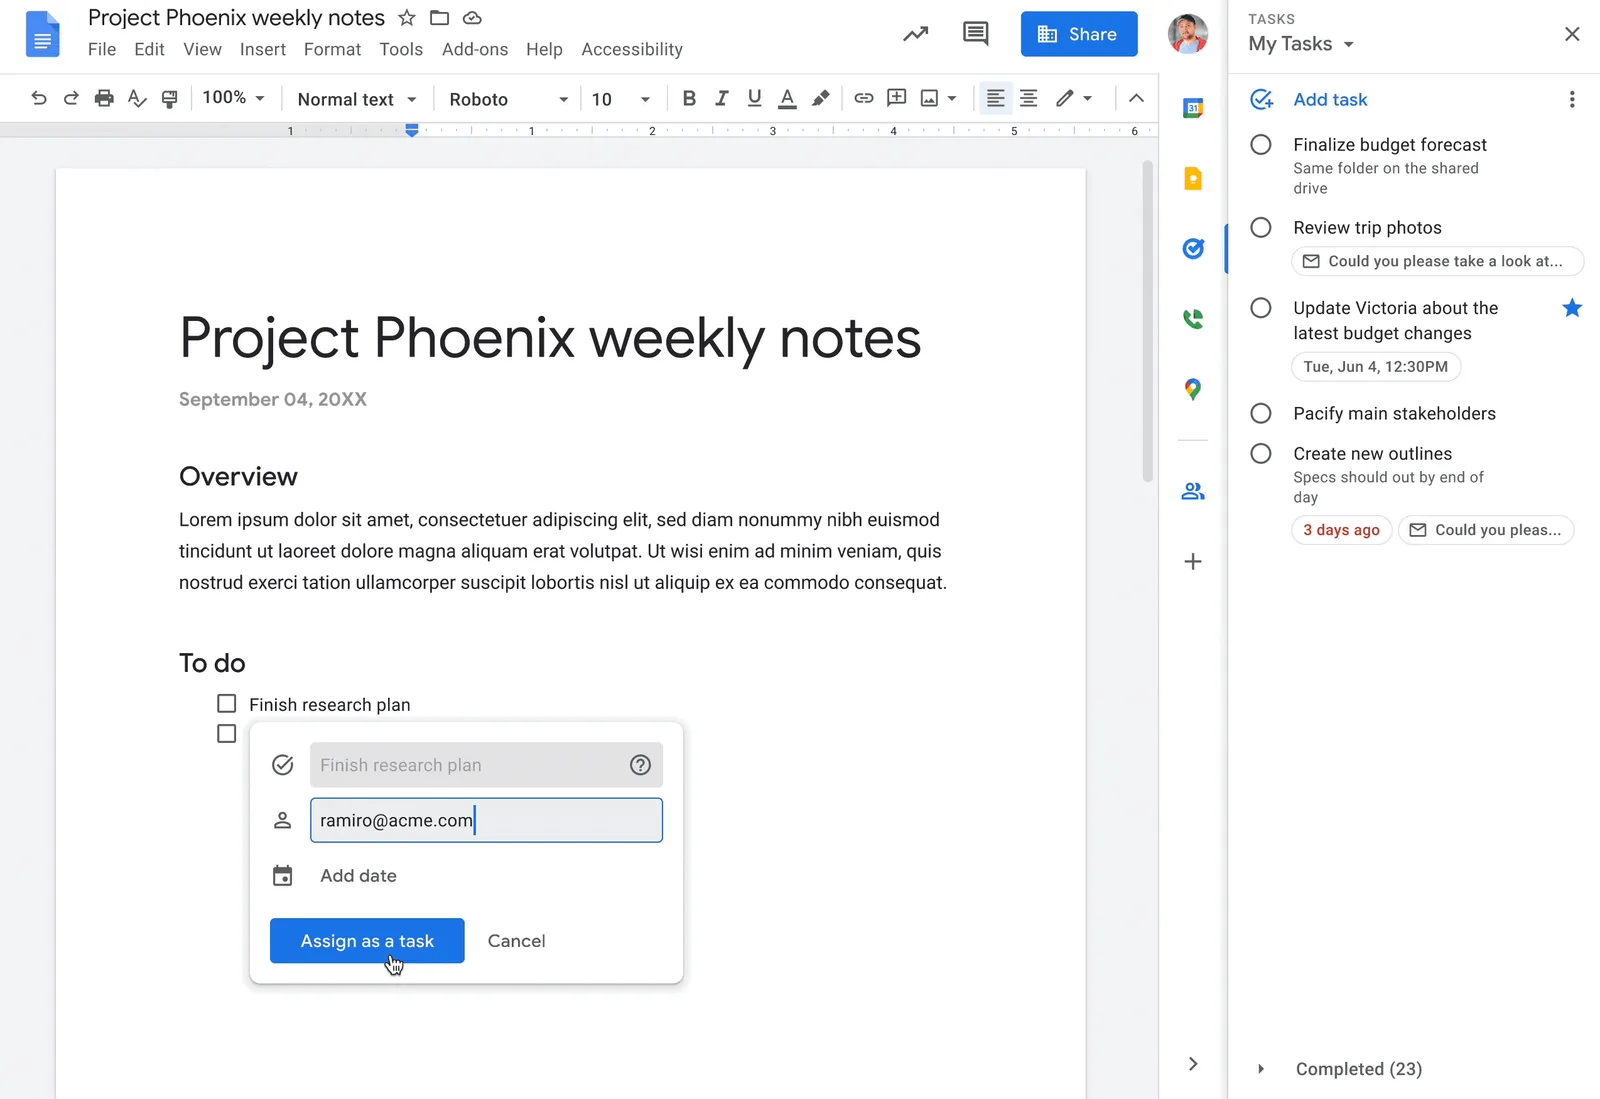
- Hover the checklist item and click the Add to Tasks icon that appears to its left. Google’s page notes that typing @task and pressing Enter creates a task without a checklist.
- Enter the assignee. Type the name of a colleague in your organization, or your own.
- Add a date if the item has a deadline. Click Date and pick a day. A dated task also appears on the assignee’s Google Calendar.
- Click Add. The person’s avatar appears next to the item, and they receive an email notification that includes your address.
What syncs between the document and Google Tasks
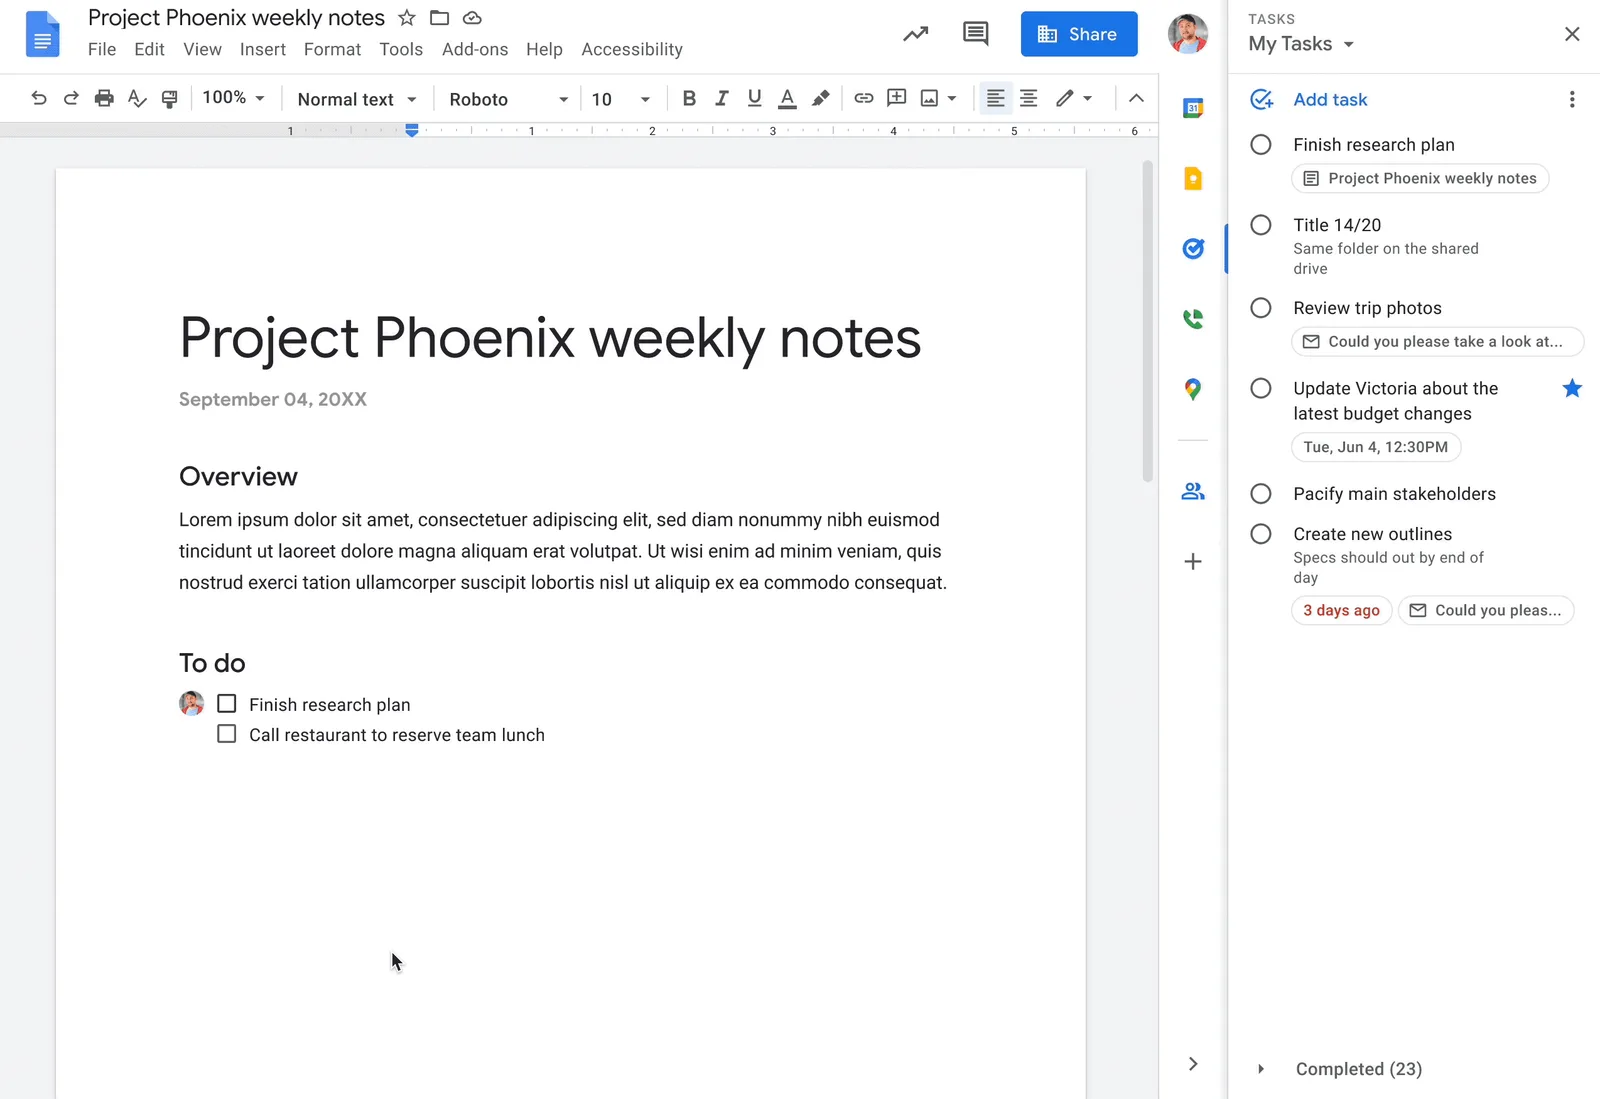
The announcement describes the link as two-way: a change to the title, due date or completion state made in Tasks shows in the document, and the other way round. Checking the box in the document marks the task complete in the assignee’s list, and Google’s help page says the assignee gets an email about it.
To see every task from one document, open Tools, then Tasks. Clicking a task in that panel scrolls the document to its checklist item.
Google’s help page also explains the blue dot that sometimes appears on the icon beside an item. It means the checklist text and the task title have drifted apart, or the document was reverted, and pointing to it and clicking Update brings the two back in line.
Limits of tasks assigned from a document
Tasks assigned in Docs are what Google calls shared tasks, and they follow the rules of Google’s shared tasks page. That page says you can neither create a subtask on a shared task nor make it repeat, so a step with several parts is better written as several checklist items.
The same page lists the notifications: emails when a task is created, assigned or reassigned, completed or reopened, deleted before completion, or renamed or rescheduled from Docs. To quiet them for one document, Google’s assign page points to Open comment history, then Notification settings.
Google Docs Checklist vs Google Tasks: Which One to Use
The two are not rivals. A checklist keeps steps next to the text that explains them, while Google Tasks puts an item on your calendar and in your Gmail side panel.
A simple rule covers most cases: steps that are meaningless without the document (meeting notes, a launch plan, a procedure) stay a checklist, and an item that needs a deadline and a reminder becomes a task.
On a Workspace account you get both: the document holds the plan, the assigned tasks hold the follow-through. When a whole team runs the same checklists every week, our guide to Google Tasks for teams explains where Google’s shared tasks stop and a shared list takes over.
Where Assigned Checklist Items Land, and How TasksBoard Shows Them
Google’s assign page says tasks created from a document sync with your default list, “My Tasks”, and can be moved into other lists afterwards. There is no setting to pick a different destination at assignment time.
In TasksBoard, the task appears in that same default list, on the board that holds it, with no extra setup. The help center page on tasks assigned from Google Docs and Chat describes two chips on the card: an “Assigned from Google Docs” chip, and the document title, which opens the document at the item.
The “Assigned to me” smart board in the sidebar collects them with the tasks teammates assigned to you in TasksBoard. Completing one in TasksBoard checks the box in the document, because both read the same Google task.
To get it out of “My Tasks”, drag it onto another list, or use Move to another list in its three dots menu for a list on another board. The chip travels with it.
 Try TasksBoard
See every checklist item assigned to you in Docs on one kanban board, with a chip back to the document, next to the rest of your Google Tasks. Free to start, and nothing leaves Google Tasks.
Get Started →Route Docs assignments into a shared list
On the Team plan, the same help center page describes a switch in the Shared List dialog, “Route tasks assigned to me from Docs/Chat into this list”, that each member turns on for one shared list.
From then on, every task assigned to that person from a document is moved into the shared list, even while the app is closed. Teammates see it with that person as the assignee, completed tasks are never moved, and the chips stay in place.
What these tasks cannot do
Google restricts tasks assigned from a document, and TasksBoard cannot lift those limits. Google rejects notes on such a task, and since TasksBoard stores labels, attached files and its own assignees inside the notes, none of those can be added.
The title and the due date stay editable, and the task can be completed, reopened and moved like any other. For work that starts on the board rather than in a document, you can assign Google Tasks to teammates on a shared list, with labels and files included.
FAQ
Conclusion
A Google Docs checklist is the right tool when the steps belong with the words around them. One click on the Checklist button, Tab for sub-steps, and a style switch if the strikethrough bothers you.
On a work or school account, the Add to Tasks icon turns any item into a Google Task with an owner and a date, synced both ways with the document. Those tasks land in “My Tasks”, and that is where a board earns its keep: TasksBoard shows every assigned item next to the rest of your Google Tasks, with a chip back to the document, and on the Team plan routes them straight into your shared list.