User Story Mapping: Step-by-Step Guide for Agile Teams in 2026
A product backlog that is just a stack of user stories tells you what to build but not why, in what order, or how the pieces connect. User story mapping solves this by adding structure: a visual map that shows how features relate to user activities, which stories deliver the most value, and which ones can safely wait.
Developed by Jeff Patton, user story mapping has become a standard practice for agile product teams who need to translate user needs into a prioritized, coherent development plan. This guide covers how to run a mapping session from start to finish.
What Is User Story Mapping?
User story mapping is a collaborative technique for organizing user stories into a two-dimensional map. The horizontal axis represents the user’s journey through your product — the sequence of activities they complete to achieve a goal. The vertical axis represents priority — the most important stories are at the top, with lower-priority alternatives and enhancements below.
The result is a visual structure that shows:
- The backbone — the high-level activities in the user’s journey (horizontal)
- The walking skeleton — the minimum set of stories needed to support a complete, working release
- Release slices — horizontal cuts through the map that define what goes into each release or sprint
- Depth — the full range of possible features, from core functionality to edge cases
Unlike a flat backlog, a story map makes it impossible to misread priority or lose the context of why a feature exists.
Why User Story Maps Beat Flat Backlogs
Most teams manage their backlog as an ordered list. The problem with a flat list is that it strips away context. A user story like “As a user, I can reset my password” exists in isolation — you cannot see how it relates to the login flow, which release it belongs to, or what would break if it were delayed.
A story map restores that context by showing where each story fits in the user’s journey. This matters in several ways:
Better prioritization. When you can see that a story is essential to a core user flow versus an edge case, prioritization becomes more obvious.
Easier release planning. Release slices on a story map are immediately visible — you can see what a minimum viable release looks like and what you are adding with each subsequent release.
Shared understanding. Teams that build a story map together develop a common picture of what they are building and why. This reduces misalignment between developers, designers, and product managers.
Identifying gaps. When you lay out all the stories for a user activity, gaps — missing features, unanswered questions — become visible in a way they never would in a list.
Core Concepts Before You Map
Before running a mapping session, make sure your team is familiar with these concepts.
User Stories
A user story is a short description of a feature written from the user’s perspective: “As a [type of user], I want [some action] so that [some benefit].”
User stories are not specifications — they are conversation starters. The story captures intent; the conversation that follows (with acceptance criteria, designs, and technical decisions) captures the details.
Activities
An activity is a high-level thing a user does in your product — not a feature, but a meaningful action. For a project management tool, activities might be: “Create a project,” “Manage tasks,” “Track progress,” “Collaborate with team,” “Review results.”
Activities form the backbone of your story map.
Tasks
Under each activity are the specific tasks a user completes to accomplish that activity. Under “Manage tasks,” tasks might include: “Add a task,” “Set a due date,” “Assign to a team member,” “Move task to done.”
Tasks are more granular than activities but still describe what the user does, not how the system implements it.
User Stories (Map Level)
Under each task are the specific user stories — the actual development work. One task might generate three or four stories depending on the level of detail needed.
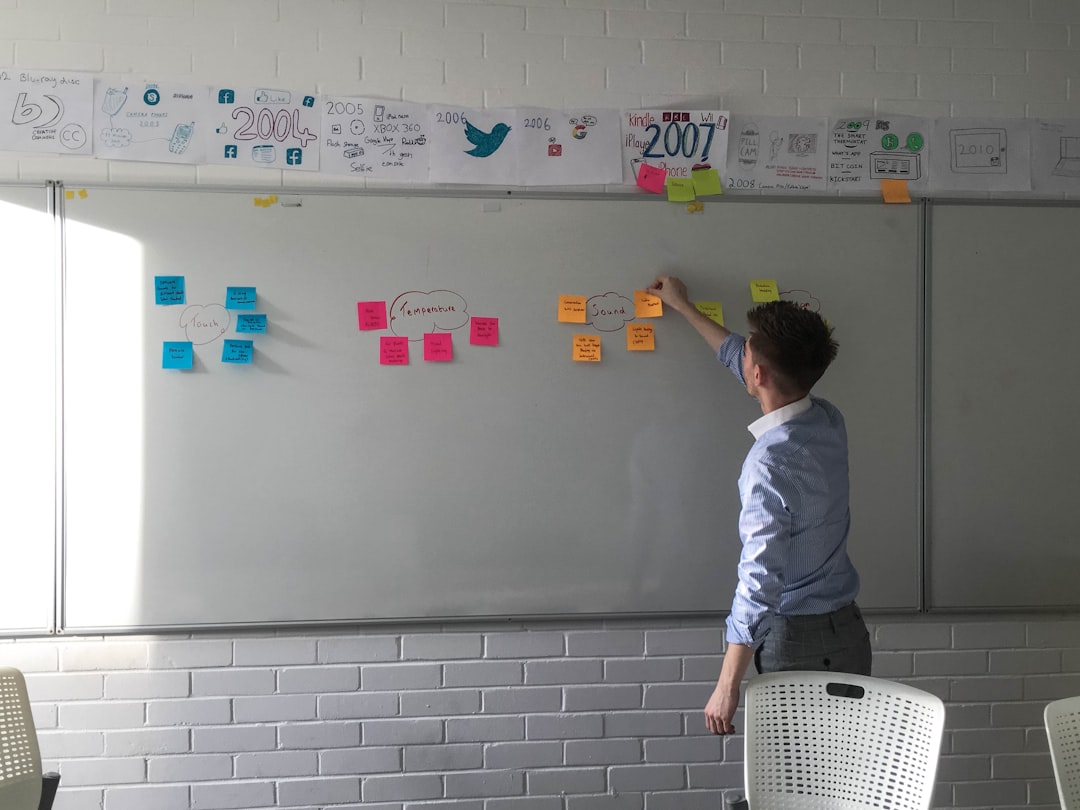
How to Run a User Story Mapping Session
A mapping session typically takes two to four hours for a focused product area and involves the whole team: product manager, designers, developers, and ideally at least one person with customer insight.
Step 1: Define the User and Goal
Start by aligning on who you are mapping for and what goal they are trying to achieve. Avoid mapping for a vague “user” — define a specific persona or user type.
Example: “We are mapping the experience of a team manager setting up a new project in TasksBoard for the first time.”
Write this at the top of your map. It keeps the session focused.
Step 2: Build the Narrative Backbone
On sticky notes (physical or digital), map out the high-level activities in the user’s journey, left to right, in chronological order.
Do not go deep — stay at the activity level. The goal is to capture the complete journey in a handful of steps. For our TasksBoard example: “Sign up → Set up account → Create project → Add team → Add tasks → Track progress.”
This row of activities is your backbone.
Step 3: Identify Tasks for Each Activity
For each activity, add the tasks that make it up in a column below the activity. Ask: “What does the user actually do to complete this activity?”
Under “Create project”: “Name the project,” “Set a deadline,” “Choose a category,” “Set visibility,” “Create the first task list.”
Go wide before going deep. You want to capture all the meaningful tasks before prioritizing.
Step 4: Write User Stories
Under each task, write the user stories that represent the development work needed. One task might generate multiple stories at different detail levels.
“Name the project” → “As a user, I can enter a name when creating a project” + “As a user, I can edit the project name after creation.”
Step 5: Prioritize and Slice
Now draw horizontal lines across the map to create release slices.
The first slice (closest to the activities) is your walking skeleton — the minimum set of stories that produces a working, end-to-end experience even if it is not complete. Ask: what is the smallest thing we could build that allows a user to complete the full journey?
Everything below the first slice is added value. Group these into subsequent releases based on priority.
Step 6: Identify Gaps and Questions
With the full map visible, walk through each column and ask: “Is anything missing? What questions do we still need to answer before development can start?”
Gaps and open questions are just as valuable as the stories themselves — they represent risks to address before the sprint begins.
User Story Mapping Tools
| Tool | Format | Best For |
|---|---|---|
| Miro | Digital whiteboard | Distributed teams, collaborative sessions |
| Mural | Digital whiteboard | Remote workshops, templates |
| FigJam | Design-adjacent teams | Teams already in Figma |
| Trello / TasksBoard | Card-based | After mapping, moving to execution |
| Physical sticky notes | In-person sessions | High-bandwidth collaboration |
Many teams do the initial mapping session on a digital whiteboard (Miro or Mural), then transfer the resulting stories into their task management system for execution.
If your team uses Google Workspace, TasksBoard integrates well as the execution layer — stories from the map become tasks on a shared kanban board, with full team visibility.
Connecting Story Maps to Sprint Planning
Once you have a story map, sprint planning becomes significantly easier. Your release slices define the logical unit of work for each sprint.
For the first sprint, take the walking skeleton slice: the stories that produce the minimum viable experience. Estimate them, confirm the team has capacity, and add them to the sprint backlog.
For subsequent sprints, move down through the slices. The map shows you not just which stories to build next but why — because they fill a gap in the user experience the team has already agreed is the next priority.
This connection between story maps and sprint planning prevents the common problem of building features in an order that does not deliver user value until very late. The story map ensures each sprint produces something that can be tested, demonstrated, or released.
Related reading: Sprint Planning: How to Run an Effective Session
Common User Story Mapping Mistakes
Mapping too deep too early. Teams sometimes try to write all the stories before establishing the backbone. Start wide (activities → tasks) before going deep (stories). You will discover gaps and reorderings that change your stories anyway.
Mapping a system, not a user journey. The backbone should reflect what the user does, not how the system is organized. If your backbone matches your application’s navigation menu rather than the user’s goal sequence, you are mapping the system.
Skipping the walking skeleton. Every story map session should end with an agreed walking skeleton — the minimum that delivers a complete (if thin) user experience. Without it, the map is just an organized list with no release guidance.
Not involving the full team. A story map created by the product manager alone and presented to developers loses most of the value. The session should involve everyone who will build the product.
Never revisiting the map. Story maps should evolve as you learn. If the map is created once and shelved, it quickly becomes outdated and stops being useful.
FAQ
How long does a user story mapping session take?
For a focused product area, two to four hours. For a full product with multiple user journeys, a full day workshop is more appropriate. Split across multiple sessions if the scope is large.
How many people should attend a story mapping session?
Three to eight is ideal. Smaller and you miss perspectives; larger and the session becomes difficult to facilitate. Include at minimum: product, design, and one or two developers.
What is the difference between a story map and a product roadmap?
A story map shows what to build and in what order within a specific user journey. A product roadmap shows when major features or releases will happen at a higher level. The two are complementary — the story map informs the roadmap.
Can user story mapping be done remotely?
Yes, effectively. Digital whiteboard tools like Miro or Mural replicate most of what you would do with physical sticky notes. The key is ensuring everyone has prepared, the facilitator controls pacing, and the session has clear time boundaries.
What happens after the story mapping session?
Transfer stories into your task management system with owners and due dates. Use the walking skeleton as the input to your next sprint planning session. Schedule a follow-up to review the map in two to four weeks.
Is user story mapping only for software products?
No. The technique works for any experience with a user journey — service design, process improvement, marketing campaigns. Anywhere you can draw a left-to-right sequence of user activities, a story map can clarify prioritization.
Run Better Sprints with TasksBoard
After your story mapping session, the stories need a home for execution. TasksBoard gives your team a shared kanban board built on Google Tasks — add stories as tasks, assign owners, track progress across columns, and keep the whole team aligned without status meetings.
From mapping to shipping, the goal is always the same: build the right things in the right order. User story mapping gives you the map. TasksBoard gives you the board to execute against it.
Ready to share your Google Tasks?
Get started with TasksBoard for free, no credit card required.
Sign in